このページは日本語に翻訳済みです。
place要素関数要素関数要素関数はsetルールやshowルールでカスタマイズできます。
setルールやshowルールでカスタマイズできます。Places content relatively to its parent container.
Placed content can be either overlaid (the default) or floating. Overlaid
content is aligned with the parent container according to the given
alignment, and shown over any other content added so
far in the container. Floating content is placed at the top or bottom of
the container, displacing other content down or up respectively. In both
cases, the content position can be adjusted with dx and
dy offsets without affecting the layout.
The parent can be any container such as a block, box,
rect, etc. A top level place call will place content directly
in the text area of the current page. This can be used for absolute
positioning on the page: with a top + left
alignment, the offsets dx and dy will set the
position of the element's top left corner relatively to the top left corner
of the text area. For absolute positioning on the full page including
margins, you can use place in page.foreground or
page.background.
Examples
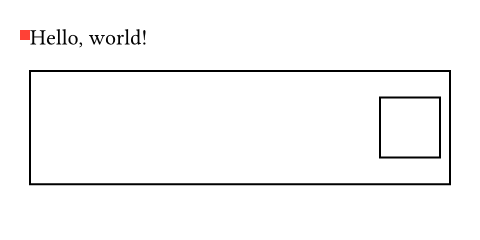
#set page(height: 120pt)
Hello, world!

#rect(
  width: 100%,
  height: 2cm,
  place(horizon + right, square()),
)

#place(
  top + left,
  dx: -5pt,
  square(size: 5pt, fill: red),
)
Effect on the position of other elements
Overlaid elements don't take space in the flow of content, but a place
call inserts an invisible block-level element in the flow. This can
affect the layout by breaking the current paragraph. To avoid this,
you can wrap the place call in a box when the call is made
in the middle of a paragraph. The alignment and offsets will then be
relative to this zero-size box. To make sure it doesn't interfere with
spacing, the box should be attached to a word using a word joiner.
For example, the following defines a function for attaching an annotation to the following word:
#let annotate(..args) = {
  box(place(..args))
  sym.wj
  h(0pt, weak: true)
}

A placed #annotate(square(), dy: 2pt)
square in my text.

The zero-width weak spacing serves to discard spaces between the function call and the next word.
引数引数引数は関数への入力値です。関数名の後に括弧で囲んで指定します。
alignment
Relative to which position in the parent container to place the content.
- If
floatisfalse, then this can be any alignment other thanauto. - If
floatistrue, then this must beauto,top, orbottom.
When float is false and no vertical alignment is specified, the
content is placed at the current position on the vertical axis.
デフォルト値: start
scope設定可能引数設定可能引数設定可能引数は、setルールを用いて設定でき、それ以降で使用するデフォルト値を変更できます。
setルールを用いて設定でき、それ以降で使用するデフォルト値を変更できます。Relative to which containing scope something is placed.
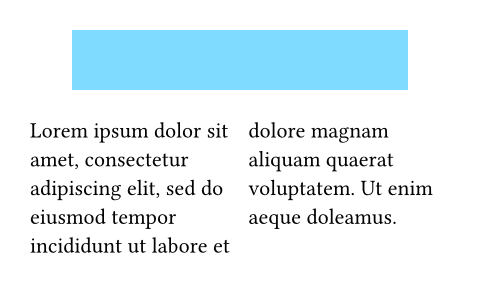
The parent scope is primarily used with figures and, for
this reason, the figure function has a mirrored scope
parameter. Nonetheless, it can also be more generally
useful to break out of the columns. A typical example would be to
create a single-column title section
in a two-column document.
Note that parent-scoped placement is currently only supported if float
is true. This may change in the future.
使用可能な文字列値:
columnPlace into the current column.
parentPlace relative to the parent, letting the content span over all columns.
デフォルト値: "column"
例を表示
#set page(height: 150pt, columns: 2)
#place(
  top + center,
  scope: "parent",
  float: true,
  rect(width: 80%, fill: aqua),
)

#lorem(25)
float設定可能引数設定可能引数設定可能引数は、setルールを用いて設定でき、それ以降で使用するデフォルト値を変更できます。
setルールを用いて設定でき、それ以降で使用するデフォルト値を変更できます。Whether the placed element has floating layout.
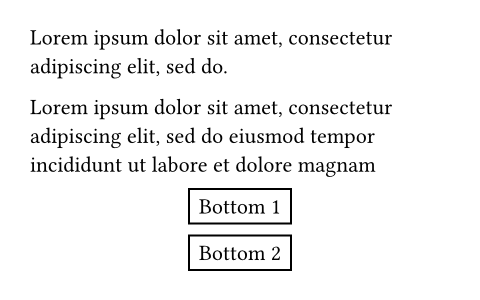
Floating elements are positioned at the top or bottom of the parent
container, displacing in-flow content. They are always placed in the
in-flow order relative to each other, as well as before any content
following a later place.flush element.
デフォルト値: false
例を表示
#set page(height: 150pt)
#let note(where, body) = place(
  center + where,
  float: true,
  clearance: 6pt,
  rect(body),
)

#lorem(10)
#note(bottom)[Bottom 1]
#note(bottom)[Bottom 2]
#lorem(40)
#note(top)[Top]
#lorem(10)
clearance設定可能引数設定可能引数設定可能引数は、setルールを用いて設定でき、それ以降で使用するデフォルト値を変更できます。
setルールを用いて設定でき、それ以降で使用するデフォルト値を変更できます。The spacing between the placed element and other elements in a floating layout.
Has no effect if float is false.
デフォルト値: 1.5em
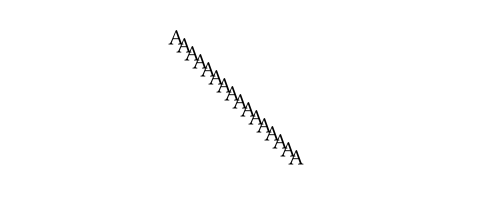
dx設定可能引数設定可能引数設定可能引数は、setルールを用いて設定でき、それ以降で使用するデフォルト値を変更できます。
setルールを用いて設定でき、それ以降で使用するデフォルト値を変更できます。The horizontal displacement of the placed content.
デフォルト値: 0% + 0pt
例を表示
#set page(height: 100pt)
#for i in range(16) {
  let amount = i * 4pt
  place(center, dx: amount - 32pt, dy: amount)[A]
}
This does not affect the layout of in-flow content.
In other words, the placed content is treated as if it
were wrapped in a move element.
dy設定可能引数設定可能引数設定可能引数は、setルールを用いて設定でき、それ以降で使用するデフォルト値を変更できます。
setルールを用いて設定でき、それ以降で使用するデフォルト値を変更できます。The vertical displacement of the placed content.
This does not affect the layout of in-flow content.
In other words, the placed content is treated as if it
were wrapped in a move element.
デフォルト値: 0% + 0pt
body
The content to place.
定義定義これらの関数や型には、関連する定義を持たせることができます。定義にアクセスするには、対象の関数や型の名前を指定した後に、ピリオド区切りで定義名を記述します。
flush要素関数要素関数要素関数はsetルールやshowルールでカスタマイズできます。
setルールやshowルールでカスタマイズできます。Asks the layout algorithm to place pending floating elements before continuing with the content.
This is useful for preventing floating figures from spilling into the next section.
例を表示
#lorem(15)

#figure(
  rect(width: 100%, height: 50pt),
  placement: auto,
  caption: [A rectangle],
)

#place.flush()

This text appears after the figure.
