このページは日本語に翻訳済みです。
par要素関数要素関数要素関数はsetルールやshowルールでカスタマイズできます。
setルールやshowルールでカスタマイズできます。A logical subdivison of textual content.
Typst automatically collects inline-level elements into paragraphs. Inline-level elements include text, horizontal spacing, boxes, and inline equations.
To separate paragraphs, use a blank line (or an explicit parbreak).
Paragraphs are also automatically interrupted by any block-level element
(like block, place, or anything that shows itself as one of these).
The par element is primarily used in set rules to affect paragraph
properties, but it can also be used to explicitly display its argument as a
paragraph of its own. Then, the paragraph's body may not contain any
block-level content.
Boxes and blocks
As explained above, usually paragraphs only contain inline-level content.
However, you can integrate any kind of block-level content into a paragraph
by wrapping it in a box.
Conversely, you can separate inline-level content from a paragraph by
wrapping it in a block. In this case, it will not become part of any
paragraph at all. Read the following section for an explanation of why that
matters and how it differs from just adding paragraph breaks around the
content.
What becomes a paragraph?
When you add inline-level content to your document, Typst will automatically wrap it in paragraphs. However, a typical document also contains some text that is not semantically part of a paragraph, for example in a heading or caption.
The rules for when Typst wraps inline-level content in a paragraph are as follows:
-
All text at the root of a document is wrapped in paragraphs.
-
Text in a container (like a
block) is only wrapped in a paragraph if the container holds any block-level content. If all of the contents are inline-level, no paragraph is created.
In the laid-out document, it's not immediately visible whether text became part of a paragraph. However, it is still important for various reasons:
-
Certain paragraph styling like
first-line-indentwill only apply to proper paragraphs, not any text. Similarly,parshow rules of course only trigger on paragraphs. -
A proper distinction between paragraphs and other text helps people who rely on assistive technologies (such as screen readers) navigate and understand the document properly. Currently, this only applies to HTML export since Typst does not yet output accessible PDFs, but support for this is planned for the near future.
-
HTML export will generate a
<p>tag only for paragraphs.
When creating custom reusable components, you can and should take charge
over whether Typst creates paragraphs. By wrapping text in a block
instead of just adding paragraph breaks around it, you can force the absence
of a paragraph. Conversely, by adding a parbreak after some content in a
container, you can force it to become a paragraph even if it's just one
word. This is, for example, what non-tight lists do to
force their items to become paragraphs.
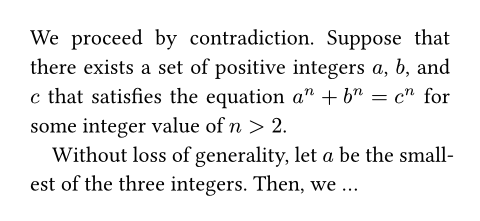
Example
#set par(
  first-line-indent: 1em,
  spacing: 0.65em,
  justify: true,
)

We proceed by contradiction.
Suppose that there exists a set
of positive integers $a$, $b$, and
$c$ that satisfies the equation
$a^n + b^n = c^n$ for some
integer value of $n > 2$.

Without loss of generality,
let $a$ be the smallest of the
three integers. Then, we ...

引数引数引数は関数への入力値です。関数名の後に括弧で囲んで指定します。
leading設定可能引数設定可能引数設定可能引数は、setルールを用いて設定でき、それ以降で使用するデフォルト値を変更できます。
setルールを用いて設定でき、それ以降で使用するデフォルト値を変更できます。The spacing between lines.
Leading defines the spacing between the bottom edge of one line and the top edge of the following line. By default, these two properties are up to the font, but they can also be configured manually with a text set rule.
By setting top edge, bottom edge, and leading, you can also configure a
consistent baseline-to-baseline distance. You could, for instance, set
the leading to 1em, the top-edge to 0.8em, and the bottom-edge
to -0.2em to get a baseline gap of exactly 2em. The exact
distribution of the top- and bottom-edge values affects the bounds of
the first and last line.
デフォルト値: 0.65em
spacing設定可能引数設定可能引数設定可能引数は、setルールを用いて設定でき、それ以降で使用するデフォルト値を変更できます。
setルールを用いて設定でき、それ以降で使用するデフォルト値を変更できます。The spacing between paragraphs.
Just like leading, this defines the spacing between the bottom edge of a paragraph's last line and the top edge of the next paragraph's first line.
When a paragraph is adjacent to a block that is not a paragraph,
that block's above or below property
takes precedence over the paragraph spacing. Headings, for instance,
reduce the spacing below them by default for a better look.
デフォルト値: 1.2em
justify設定可能引数設定可能引数設定可能引数は、setルールを用いて設定でき、それ以降で使用するデフォルト値を変更できます。
setルールを用いて設定でき、それ以降で使用するデフォルト値を変更できます。Whether to justify text in its line.
Hyphenation will be enabled for justified paragraphs if the
text function's hyphenate property is set to
auto and the current language is known.
Note that the current alignment still has an effect on the placement of the last line except if it ends with a justified line break.
デフォルト値: false
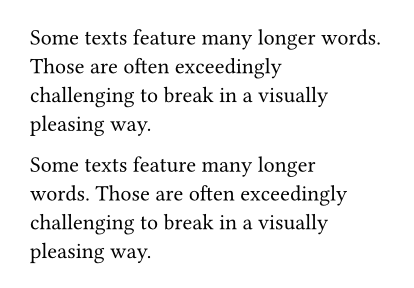
linebreaks
How to determine line breaks.
When this property is set to auto, its default value, optimized line
breaks will be used for justified paragraphs. Enabling optimized line
breaks for ragged paragraphs may also be worthwhile to improve the
appearance of the text.
使用可能な文字列値:
simpleDetermine the line breaks in a simple first-fit style.
optimizedOptimize the line breaks for the whole paragraph.
Typst will try to produce more evenly filled lines of text by considering the whole paragraph when calculating line breaks.
デフォルト値: auto
例を表示
#set page(width: 207pt)
#set par(linebreaks: "simple")
Some texts feature many longer
words. Those are often exceedingly
challenging to break in a visually
pleasing way.

#set par(linebreaks: "optimized")
Some texts feature many longer
words. Those are often exceedingly
challenging to break in a visually
pleasing way.

first-line-indent設定可能引数設定可能引数設定可能引数は、setルールを用いて設定でき、それ以降で使用するデフォルト値を変更できます。
setルールを用いて設定でき、それ以降で使用するデフォルト値を変更できます。The indent the first line of a paragraph should have.
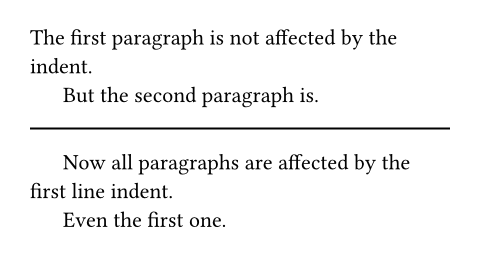
By default, only the first line of a consecutive paragraph will be indented (not the first one in the document or container, and not paragraphs immediately following other block-level elements).
If you want to indent all paragraphs instead, you can pass a dictionary
containing the amount of indent as a length and the pair
all: true. When all is omitted from the dictionary, it defaults to
false.
By typographic convention, paragraph breaks are indicated either by some space between paragraphs or by indented first lines. Consider
- reducing the paragraph
spacingto theleadingusingset par(spacing: 0.65em) - increasing the block
spacing(which inherits the paragraph spacing by default) to the original paragraph spacing usingset block(spacing: 1.2em)
デフォルト値: (amount: 0pt, all: false)
例を表示
#set block(spacing: 1.2em)
#set par(
  first-line-indent: 1.5em,
  spacing: 0.65em,
)

The first paragraph is not affected
by the indent.

But the second paragraph is.

#line(length: 100%)

#set par(first-line-indent: (
  amount: 1.5em,
  all: true,
))

Now all paragraphs are affected
by the first line indent.

Even the first one.

hanging-indent設定可能引数設定可能引数設定可能引数は、setルールを用いて設定でき、それ以降で使用するデフォルト値を変更できます。
setルールを用いて設定でき、それ以降で使用するデフォルト値を変更できます。The indent that all but the first line of a paragraph should have.
デフォルト値: 0pt
例を表示
#set par(hanging-indent: 1em)

#lorem(15)

body
The contents of the paragraph.
定義定義これらの関数や型には、関連する定義を持たせることができます。定義にアクセスするには、対象の関数や型の名前を指定した後に、ピリオド区切りで定義名を記述します。
line要素関数要素関数要素関数はsetルールやshowルールでカスタマイズできます。
setルールやshowルールでカスタマイズできます。A paragraph line.
This element is exclusively used for line number configuration through set rules and cannot be placed.
The numbering option is used to enable line
numbers by specifying a numbering format.
例を表示
#set par.line(numbering: "1")

Roses are red. \
Violets are blue. \
Typst is there for you.

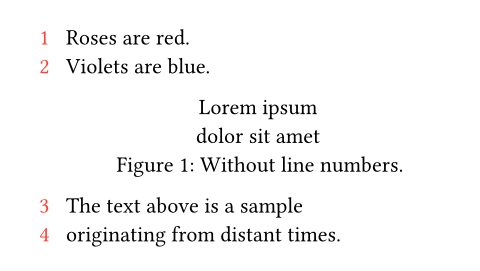
The numbering option takes either a predefined
numbering pattern or a function returning styled content. You
can disable line numbers for text inside certain elements by setting the
numbering to none using show-set rules.
// Styled red line numbers.
#set par.line(
  numbering: n => text(red)[#n]
)

// Disable numbers inside figures.
#show figure: set par.line(
  numbering: none
)

Roses are red. \
Violets are blue.

#figure(
  caption: [Without line numbers.]
)[
  Lorem ipsum \
  dolor sit amet
]

The text above is a sample \
originating from distant times.

This element exposes further options which may be used to control other
aspects of line numbering, such as its alignment
or margin. In addition, you can control whether
the numbering is reset on each page through the
numbering-scope option.
numbering
How to number each line. Accepts a numbering pattern or function.
デフォルト値: none
例を表示
#set par.line(numbering: "I")

Roses are red. \
Violets are blue. \
Typst is there for you.

number-align
The alignment of line numbers associated with each line.
The default of auto indicates a smart default where numbers grow
horizontally away from the text, considering the margin they're in and
the current text direction.
デフォルト値: auto
例を表示
#set par.line(
  numbering: "I",
  number-align: left,
)

Hello world! \
Today is a beautiful day \
For exploring the world.

number-margin設定可能引数設定可能引数設定可能引数は、setルールを用いて設定でき、それ以降で使用するデフォルト値を変更できます。
setルールを用いて設定でき、それ以降で使用するデフォルト値を変更できます。The margin at which line numbers appear.
Note: In a multi-column document, the line numbers for paragraphs
inside the last column will always appear on the end margin (right
margin for left-to-right text and left margin for right-to-left),
regardless of this configuration. That behavior cannot be changed at
this moment.
デフォルト値: start
例を表示
#set par.line(
  numbering: "1",
  number-margin: right,
)

= Report
- Brightness: Dark, yet darker
- Readings: Negative

number-clearance
The distance between line numbers and text.
The default value of auto results in a clearance that is adaptive to
the page width and yields reasonable results in most cases.
デフォルト値: auto
例を表示
#set par.line(
  numbering: "1",
  number-clearance: 4pt,
)

Typesetting \
Styling \
Layout

numbering-scope設定可能引数設定可能引数設定可能引数は、setルールを用いて設定でき、それ以降で使用するデフォルト値を変更できます。
setルールを用いて設定でき、それ以降で使用するデフォルト値を変更できます。Controls when to reset line numbering.
Note: The line numbering scope must be uniform across each page run (a page run is a sequence of pages without an explicit pagebreak in between). For this reason, set rules for it should be defined before any page content, typically at the very start of the document.
使用可能な文字列値:
documentIndicates that the line number counter spans the whole document, i.e., it's never automatically reset.
pageIndicates that the line number counter should be reset at the start of every new page.
デフォルト値: "document"
例を表示
#set par.line(
  numbering: "1",
  numbering-scope: "page",
)

First line \
Second line
#pagebreak()
First line again \
Second line again
